I grew up hearing that egg yolks were the root of all culinary evil. Oh, the cholesterol! Oh, the fat! Beware the omelet, for your veins will solidify.
And while it's true that eating scads of anything will affect your body negatively, these studies neglected to recognize eating in moderation. Well, that, and the fact that the majority of an egg's nutrients are in the yolk.
Let me tell you a secret. Since I started this weight loss journey in January, I have been eating about an egg a day. The whole egg. White AND yolk. I've upped my exercise, and lowered my overall fat and calorie intake, but the egg has been by my side (and my insides, heh) all along. My cholesterol level has come down quite a bit, and I'm down a little over 41 pounds. When used in moderation, eggs are a great source of vitamins, protein, healthy lipids, and tastiness.
And to celebrate the egg (and the upcoming holiday in which they star) I'll be sharing a pair of egg-centric entries with you.
Today we'll start with my tutorial for an easy-as-quiche (that's egg pie, right?) dye technique. If you like it, let me know if you try it with your family (or your sugar-centric bacchanal pals) this weekend!
I've always admired the Czech kraslice eggs of my heritage - especially after my sister took a class and made some herself. They're so intricate and beautiful, but if it's not your hobby, who has time?
 |
| Photographed by Flickr user ppaces |
So last year when Martha Stewart Living recommended a dye method for patterned eggs, I fell in love. Especially because it's so simple. Other than boiled eggs and dye (we use PAAS, because what is better?) there's only one real ingredient: electrical tape.
 |
| Available at any hardware story. Probably most grocery stores. ~$3.99 per roll. |
The magic of electrical tape is that it sticks, and thus blocks the dye, and then unsticks without any unsightly goo left behind. It can go directly on a white egg, or it can go on an already-dyed egg, to create multiple colors. And it can be snipped to make shapes!
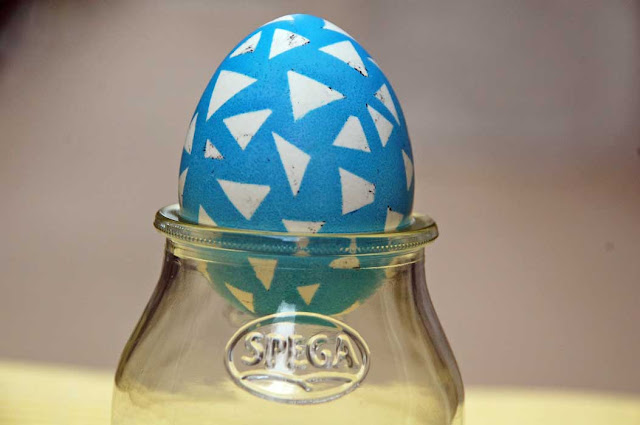
My favorite snipped-shape use of electrical tape creates a "cracked egg" pattern.
 |
| Dip the egg cracked-tape side-down into a color of your choice. You can use the little metal dipper doohickey, but I find that my fingers have more control. Though I end up with dyed tips. |
 |
| Wha-la! |
 | |
| I usually do them in a couple of different colors. (In part because I need more triangles for a different design!) |
 |
| I place the extra triangles on a plain white egg. |
 |
| Then I dye the egg, usually in a bold color to help with contrast. |
 |
| I peel off the triangles and... |
 |
| Ta-da! Stained-glass confetti egg! |
 |
| There are all kinds of patterns you can try! Including this double-square variation. Simply cut out a series of squares, overlap them, and dip once in a darker color. |
 |
| After the egg is fully dry, pull off only the top square, and dip in the same (or a lighter) color. |
 |
| Once you pull off the final square, you have a dainty mod egg! |
 |
| You can even use stripes of tape to create a precise multi-toned egg. |
 |
| As in the "cracked" variation, dip, dry and peel. |
 |
| It's best to go from dark to light, and remember to dye the first colors lighter than you want them. (They'll go through a series of baths.) |
 |
| Stripey! And all done through the magic of tape removal. |
 |
| Of course, who says you have to remove the tape? Smiley egg compliments of my darling husband. |
And now that you have an excess of boiled eggs in the fridge, check in here tomorrow for a recipe I've been developing to swap for a favorite devilishly high-calorie but delicious Easter dish. It's gonna be l'egg-and.... wait for it... dairy.
As far as food and exercise, this week has been terrific so far. Here's part 3 of my week-long food log series. I love hearing what you're eating, too, so don't forget to share!
Wednesday 4/19/11 - total 1420 calories
Breakfast: 1/2 cup fat free greek yogurt, 1/2 cup strawberries, 1 egg "fried" in Pam, 1 low carb tortilla, tb fat free sour cream, 1 fat free Kraft single (I know, I know. Pasteurized cheese food-like substance. But I love me a cheesy breakfast burrito and enjoy it infrequently.)
Lunch: 1 veggie burger sandwich (2 slices light whole wheat bread, 1 Morningstar Farms veggie patty, 1 wedge Laughing Cow cheese, 4 pickle slices, 1 tsp Veganaise), 1 potato sliced and oven-baked as "fries," 2 tb ketchup, 6 oz fresh pineapple
Afternoon Snack: 1 egg. I was checking the ones I'd boiled for last night's dye-fest!
Dinner: 2 cups roasted cauliflower with 1 oz goat cheese, 1 pear, 1 wrap sandwich (low-carb tortilla, 1 tsp veganaise, 2 cherry tomatoes, 2 oz grilled chicken, 1 oz brie)
Beverages: 64 oz water, 8 oz skim milk
Have a beautiful day, everyone, and take care of you!


