Showing posts with label diy. Show all posts

Wednesday, November 2, 2011

Supper Club Potluck: Halloween Edition

Have you been to one of my Supper Clubs?  If you haven't - or if you haven't read about them on here - I explain them in my FAQ section.  Basically, it's a dinner party with friends, which I plan and create... and I always keep the entire meal below 600 calories per serving.

So far, the fare at Supper Club 600 has been a product of my own test kitchen (with or sans Tom, depending on how busy his job is during planning phase.)  It's been great for me because I don't do well when I'm bored, and a regularly-scheduled bimonthly Supper Club keeps me in forward motion, learning new skills in the kitchen, and always trying new things.

But due to some unusual scheduling, I did four consecutive months of SC600, and it exhausted me to the point that I knew if I didn't take a break, I would get burned out on a fun project that has challenged me and fulfilled me in such important ways.

When friends requested a Halloween-themed SC600, I was sad to turn them down.  Halloween is perhaps my favorite holiday of the year!  But I couldn't shake the idea that I really wanted to see my usual SC crew, all costumed to the nines.  So when my usual SC photographer, Rochelle, offered her home up, I didn't turn her down... exactly.  I turned it into a Supper Club Potluck!  That way I would get to enjoy the day with everyone, but I wouldn't have to do all of the usual legwork it takes me to test and create recipes, plan a menu, do all of the graphic design, organize the decor, buy all the groceries, and spend a couple of days cooking for a big group.

So we sent out our invitations, and on Saturday night, we gathered at Rochelle's home to eat, drink and be spooky.  I had such a blast!

I went as Medusa, thanks to a dress by Kische that I found on crazy sale at Nordstrom Rack.   I wasn't able to find a wig or headdress I liked, so I found a Medusa Crown tutorial online.  Using Sculpy clay and nail polish, I built my own crown.  I also used a Medusa makeup tutorial... you can't make it out in the photos, but I made a sparkly snakeskin pattern by using fishnet leggings!


Look, I'm turning you to stone!


Tom went as a meta/deconstructed duck-billed platypus.
This is the most excited I've seen him about a Halloween costume.
Yes, that is a velour track suit.  He ordered it for the occasion.


With my co-hostess, Rochelle the Black Swan.


For our contribution to the potluck, I brought the low-cal pumpkin dip I blogged about last week, and Tom made our signature Barbecue Jackfruit sandwiches.  I also made punch, and I really liked the recipe I came up with -- it will appear on Finishing the Hat sometime soon.

Our guests also brought some scrumptious dishes to share.


Some of which included baked enchiladas, corn bread, roasted root veggies, bruschetta, and queso.
There were also some dessert treats, not pictured.


My favorite contribution was from Lindsay - her peanut butter/apple/marshmallow mouths. SO CUTE!


Rochelle and I had a blast decorating.  We pooled our respective Halloween notions, and put together a couple of fun displays.


Probably my favorite corner - Spanish moss with pumpkins, pumpkin vines,
and the raven that once sat on my father's shoulder for his Edgar Allan Poe costume.


My "Black Hat Society" tin sign at the spiderwebby entrance.


Spiders and a spiderweb runner


Last but not least, my complete Simpsons Treehouse of Horror collection.
I was down in the dumps the year Burger King released these toys,
and my parents cheered me up by helping me collect of of them. 
I'm lucky they didn't release them this year... because I haven't eaten fast food in 10 MONTHS!


Our guests had such awesome costumes!

Swine Flu, Pig-in-a-Blanket, Beer Frau, Megan from Bridesmaids,
Medusa & Black Swan.


Patty's costume may have been my favorite from that night - every last detail from her Melissa McCarthy/Bridesmaids costume was spot-on.


Do you want a piece of this?


David wrote about his Jared from Subway costume on his blog, Keep It Up David.


Our gloved duo, Steampunk Big Bad Wolf, and Edward Scissorhands


Steampunk Big Bad Wolf was a part of a costume quartet of steampunk fairy tale characters, which was definitely my favorite group costume of the night.  We didn't get a great picture of all four of them together, so I'm sharing one they took.


Steampunk Red Riding Hood, Big Bad Wolf, Mad Hatter and Goldilocks.
Their little costume details were AMAZING.


Sonic the Hedgehog, Wario and Chum-Chum (which is especially cute because
her boyfriend was a storyboard artist for Fanboy and Chum-Chum!)


Our friends above are holding our trick-or-treat goodie bags, which Rochelle and I put together for our guests - including some Skinny Cow candy, some sugar-free Extra Dessert Delights gum, and a bunch of Halloween toys and trinkets to help everybody embrace their inner kiddo.

It was a wonderful night shared with terrific friends - and I'm so glad I took Rochelle up on her offer to co-host!  A big thanks to her, and to all of our guests, for such a fun night.

Now we're already into Thanksgiving season.  Does everybody have somewhere to be on Thanksgiving?  Anybody need a loving home?  I'm not doing an official Supper Club for the holiday, but I'm definitely cooking.  :)

Thursday, July 14, 2011

Requiem for a Ceiling

I'd like to recite a poem to commemorate the passing of my bedroom ceiling.


Oh, bedroom ceiling, naught where once you'd been,
I shudder when I think of all you've seen.
Though soon we'll have you patched and laced with paint,
For now we must admit: up there, you ain't.


Our very nice new upstairs neighbors found out that the previous condo owners did not, in fact, fix the pipes like we were all told.  Our kittens were fascinated/horrified by the leak coming through the ceiling, and then by the plumbers who cut a person-sized hole so as to fix the neighbors' pipes above.  Oh, multi-family dwellings, you suck.

On the up-side, this means that we have motivation to paint our bedroom after the ceiling is fixed - so I started to consider actually decorating it, too.

We've had the makings for a kick-ass space-age mid-century-mod bedroom for some time.  We've been collecting bit by bit over the years... we've just never gotten around to putting it together.  So I took the opportunity to create one collage of the pieces we have, and a second collage of the pieces we'd like in order to complete it.

It's currently a splattering of thoughtless and dull colors, and we're going with a red/aqua/turquoise/black pallette.


Here are the things we already have:

Clockwise from top left:
Chaise Longue by EQ3
Aqua swirl vase by Crate & Barrel
Retro red duvet by EQ3
Sunburst clock by Timekeeper
Antique dresser refurbished by Zamba in Burbank (yet to be repainted; for colors, see next image)
Wall sconce by Crate & Barrel


 Here are the things we still need:

Paint, in four shades.  (We already own bookcases, but we love this painted backsplash idea from Real Simple)
Arc lamp by George Kovacs
Pillow slipcovers by Etsy artists kainkain and sassypillows


I'm hoping that these collages - and the ceiling disaster - will help me get my butt in gear, because I really respond to whatever space I'm in. Creative spaces make my brain feel creative.  Cluttered spaces make my brain feel cluttered.  And I have a lot of creative work to do, and no room for cluttered thinking!  So here's hoping this helps me boost my creative juices.  It'll be a couple of weeks before we can get everything in place, but I'll follow up as soon as we do.

How about you?  Do you have any home projects that are hanging over your head?  How do you motivate yourselves to get down to business (without, say, ceiling waterfalls?)

Okey-dokey. I'm off to do some work of my own.  Back tomorrow with some flashy fashions... and I'm not sure if that's a good or a bad thing!  'Til then, take care of you!

Thursday, April 21, 2011

The incredible, dyeable egg

The egg, I fear, has been maligned.

I grew up hearing that egg yolks were the root of all culinary evil.  Oh, the cholesterol! Oh, the fat! Beware the omelet, for your veins will solidify.

And while it's true that eating scads of anything will affect your body negatively, these studies neglected to recognize eating in moderation.  Well, that, and the fact that the majority of an egg's nutrients are in the yolk.

Let me tell you a secret.  Since I started this weight loss journey in January, I have been eating about an egg a day.  The whole egg.  White AND yolk.  I've upped my exercise, and lowered my overall fat and calorie intake, but the egg has been by my side (and my insides, heh) all along.  My cholesterol level has come down quite a bit, and I'm down a little over 41 pounds.  When used in moderation, eggs are a great source of vitamins, protein, healthy lipids, and tastiness.

And to celebrate the egg (and the upcoming holiday in which they star) I'll be sharing a pair of egg-centric entries with you. 

Today we'll start with my tutorial for an easy-as-quiche (that's egg pie, right?) dye technique.  If you like it, let me know if you try it with your family (or your sugar-centric bacchanal pals) this weekend!

I've always admired the Czech kraslice eggs of my heritage - especially after my sister took a class and made some herself.  They're so intricate and beautiful, but if it's not your hobby, who has time?

Photographed by Flickr user ppaces

So last year when Martha Stewart Living recommended a dye method for patterned eggs, I fell in love.  Especially because it's so simple. Other than boiled eggs and dye (we use PAAS, because what is better?) there's only one real ingredient: electrical tape.

Available at any hardware story. Probably most grocery stores. ~$3.99 per roll.

The magic of electrical tape is that it sticks, and thus blocks the dye, and then unsticks without any unsightly goo left behind.  It can go directly on a white egg, or it can go on an already-dyed egg, to create multiple colors.  And it can be snipped to make shapes!

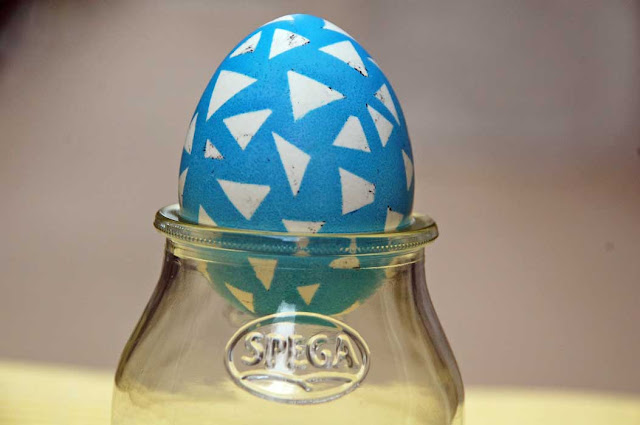
My favorite snipped-shape use of electrical tape creates a "cracked egg" pattern.

Snip triangles from a piece of electrical tape that is long enough to wrap around one egg.
Press the tape down carefully - I usually scratch it with a fingernail to seal it.
Notice those triangles all over my hands? I'll use them later for another cool design.

Dip the egg cracked-tape side-down into a color of your choice.
You can use the little metal dipper doohickey, but I find that my
fingers have more control. Though I end up with dyed tips.

It's half a cracked egg! (And a turquoise fingernail.)
Only leave the egg in until it's a shade lighter than you want it.
Leave the egg to dry completely before you remove the tape.
Then dip the whole, untaped egg in the same color dye, for a shorter period of time than before.
Wha-la!


I usually do them in a couple of different colors.
(In part because I need more triangles for a different design!)


I place the extra triangles on a plain white egg.

Then I dye the egg, usually in a bold color to help with contrast.

I peel off the triangles and...

Ta-da! Stained-glass confetti egg!


There are all kinds of patterns you can try! Including this double-square variation.
Simply cut out a series of squares, overlap them, and dip once in a darker color.

After the egg is fully dry, pull off only the top square, and dip in the same (or a lighter) color.

Once you pull off the final square, you have a dainty mod egg!

You can even use stripes of tape to create a precise multi-toned egg.

As in the "cracked" variation, dip, dry and peel.

It's best to go from dark to light, and remember to dye the first colors
lighter than you want them. (They'll go through a series of baths.)

Stripey! And all done through the magic of tape removal.
 
Of course, who says you have to remove the tape?
Smiley egg compliments of my darling husband.

And now that you have an excess of boiled eggs in the fridge, check in here tomorrow for a recipe I've been developing to swap for a favorite devilishly high-calorie but delicious Easter dish.   It's gonna be l'egg-and.... wait for it... dairy.

As far as food and exercise, this week has been terrific so far.  Here's part 3 of my week-long food log series.  I love hearing what you're eating, too, so don't forget to share!


Wednesday 4/19/11 - total 1420 calories
Breakfast: 1/2 cup fat free greek yogurt, 1/2 cup strawberries, 1 egg "fried" in Pam, 1 low carb tortilla, tb fat free sour cream, 1 fat free Kraft single (I know, I know. Pasteurized cheese food-like substance. But I love me a cheesy breakfast burrito and enjoy it infrequently.)
Lunch: 1 veggie burger sandwich (2 slices light whole wheat bread, 1 Morningstar Farms veggie patty, 1 wedge Laughing Cow cheese, 4 pickle slices, 1 tsp Veganaise), 1 potato sliced and oven-baked as "fries," 2 tb ketchup, 6 oz fresh pineapple
Afternoon Snack: 1 egg. I was checking the ones I'd boiled for last night's dye-fest!
Dinner: 2 cups roasted cauliflower with 1 oz goat cheese, 1 pear, 1 wrap sandwich (low-carb tortilla, 1 tsp veganaise, 2 cherry tomatoes, 2 oz grilled chicken, 1 oz brie)
Beverages: 64 oz water, 8 oz skim milk

Have a beautiful day, everyone, and take care of you!

Friday, April 8, 2011

Cake Pops Quest: Part the First

All right!  As I mentioned yesterday, I'm on a quest to create the best-tasting recipe for cake pops for the least amount of calories.  I have been brainstorming several variations on the theme, and will be trying them out on several test audiences (family, friends, innocent bystanders) over the next few weeks.

I wanted to start simple, just to get a feel for the process of making the pops, so I started with a base of diet soda cake.  My version is a twist on an old stand-by recipe from Weight Watchers (first introduced to me by my friend Aimee several years ago.)  All you need for these is four ingredients:


Add the diet soda to the cake mix.  It will get very frothy initially.

Mix (in a stand mixer, with a hand mixer, in a box, with a fox) for 30 seconds on low, to combine.

Mix on high for 2 minutes, to make it smooth and creamy.

Pour into a 9x13 pan (or any pans you have available) that has been sprayed with Pam or spritzed lightly with oil. 
Bake according to directions on the box. I baked this for 28 minutes at 325.

Breaktime #1!  Let the cake cool uncovered, overnight.

When you return to the cake, hack into it with two forks, making the entire thing a mess of crumbs.

When all is crummy, add your frosting to the pan.

Wash your hands, please. And then... moosh.  Moooosh the crumbs into the frosting.  Mooooooosh.

Mooshy.

Wash your hands, please.  Then take a tablespoon scoop, and dole yourself some moosh and roll it into a little ball.

In fact, roll yourself 45 little balls.  If it gets too gooey, pop the moosh into the fridge for 15 minutes. 
You can tell the freshly-fridged balls from the getting-warmer balls.

Stick 'em up.

Break #2!  Let the pops sit in the freezer overnight.

Oops. I added one ingredient to the mix in the first photo.
What can I say? The bling-y sprinkles from Kake Kreations hopped into my basket.

Heat up a double boiler and add some candy coating.
(This is better for dipping than actual chocolate or white chocolate, which is a thicker liquid when melted.)

Smooth as baby Charlotte's bottom. We assume.

Move the melted coating to a vessel which lets you can easily dip. 
I use the smallest bowl from our Crate & Barrel stackable mixing bowl set.

Snag a pop from the freezer, and dip and swirl it around in the coating. 
Make sure that all parts, including the top of the stick, are thoroughly coated so the cake does not dry out.

Decorate, if you wish.

The finished pops!

I have stored ours in the freezer - I'm told that putting them in the fridge can sometimes cause coating to sweat and soften.

128 calories per pop!

Tom and I each had one today.  They're not bad, but they're definitely cake-in-a-box-y.  If you like cake-in-a-box, you'll like them.  If you don't, you may find them to be too sweet.  (I did.)

So, here enters my quest.  I'll be swapping ingredients in and out as I experiment.  I'm looking forward to trying some from-scratch recipes that are healthier.  (The list of ingredients on a cake mix box are a bit scary.  Uber-processed isn't how we eat these days.)  I'll be trying out some unconventional add-ins (pumpkin!) and some unforeseen cake ball leave-outs (frosting!) to see how healthy I can make these without losing the yum factor.  Stay tuned over the next few weeks for Cake Pop Quest: Part the Second!